Installation and Maintenance Manual K50 Series (LED)
Warning
Read these instructions carefully before attempting to install or maintain this product. Work must
be done by qualified personnel. Improper installation or maintenance may result in personal injury
or death or significant property damage.
Installation warning
Be certain that all electrical power is disconnected from the fixture before installing or maintaining
the fixture. Failure to do so may result in personal injury or death.
Caution
Supply conductors that are run through the inside of a pole shall be supported by means capable of preventing injury and strain on the conductors.
Caution
Under no circumstances should the complete fixture, including the globe, be installed on the street light pole and arm on the ground prior to the pole being erected. Installing the complete and assembled luminaire to the pole/arm prior to pole erection and then erecting the pole with the complete luminaire attached will result in VOIDING of the King Luminaire warranty.
Introduction
Product Description
The K50 SERIES LED fixtures are designed and tested in accordance with UL1598 (prev. UL1571 and UL1572) and CSA C22.2 No. 250-00.
- The fixture is designed to operate LED light sources up to 100 watts.
- All Electrical components, including the LED tower or engine and driver assemblies; may be removed from the fixture; electrical connections must be turned off and disconnected.
Tools and Materials Needed
- 3/16” Allen Key
Questions
If additional information is required, please contact:
King Luminaire Co. Inc. Customer Service Department 1-800-268-7809 scgrp.com
Fixture Installation
1. Disconnect the electrical supply to the intended luminaire location.
2. Remove the luminaire from the packaging and check that the contents match the purchase order. Check for damage incurred in shipping. Note that for luminaires equipped with a twist lock photo-cell receptacle that the photo-cell is normally supplied by others.
3. Check that the voltage noted on the nameplate is the same as the supply voltage
4. The Driver Assembly is equipped with a quick disconnect wiring harness, or in some cases a terminal block.
For pendant style fixtures
5. The luminaire is equipped with extra-long leads to enable it to be connected to the power supply wires. Note that the connections to the power supply should be outside the luminaire.
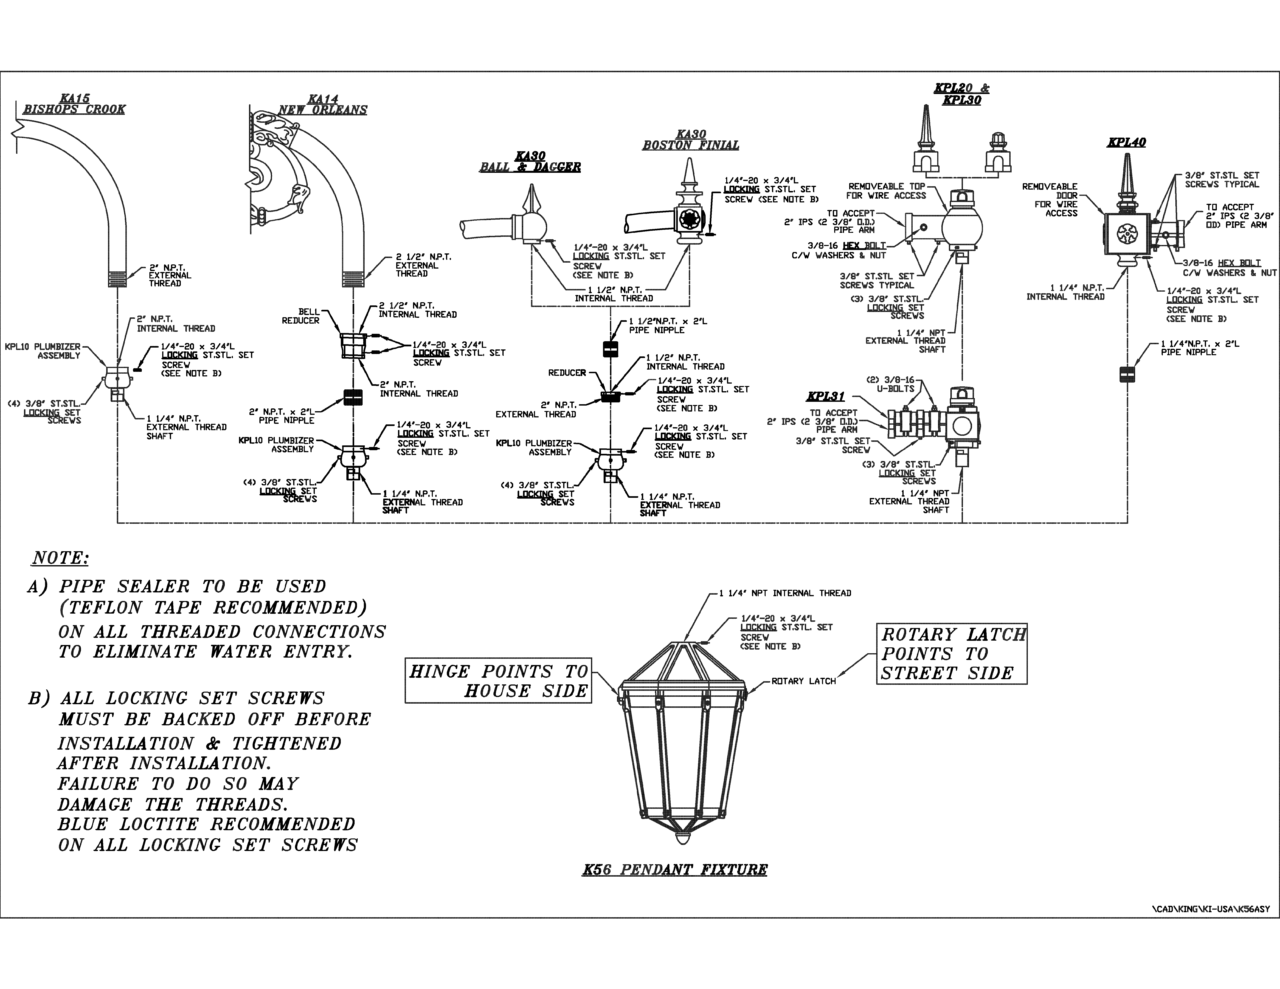
6. Apply sealing** compound to the threads at the end of the plumbizer shaft. Assemble the plumbizer housing and shaft to the threaded hole at the top of the luminaire and tighten. Lock the plumbizer shaft by tightening the locking set screw (1/4-20) located at the top end of the luminaire. If for any reason, the luminaire must be removed from the plumbizer shaft, then the locking screw MUST be loosened prior to removal.
7. Apply sealing** compound to the pipe threads at the end of the arm. Thread the power supply wires through the plumbizer housing and shaft into the luminaire. Assemble the plumbizer housing to the arm and tighten. Lock the plumbizer housing to the arm by tightening the locking screw (1/4-20) located in the housing. This screw MUST be loosened if removal of the luminaire is required for any reason.
8. Orientation of the luminaire: Physically turn the luminaire, so that the plumbizer shaft rotates within the plumbizer housing, until globes’ lid latch is facing the street side and the hinge is facing the house side. Tighten the four set screws (3/8-16) located in the plumbizer housing thereby locking the plumbizer shaft within the plumbizer housing.
9. Reconnect the power supply and check for proper orientation.
** King Luminaire recommends Teflon tape be used as a sealing compound on all threaded connections.
Failure to do so may allow water to enter the fixture, thus voiding the fixture warranty.

For Post-Top Fixtures
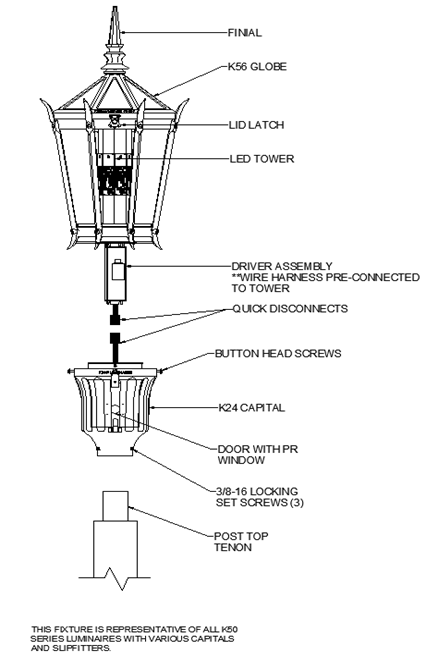
5. Remove the globe assembly, including the internal tower or engine assembly and driver assembly, from the capital; loosen the button head set screws from the capital. REMEMBER to make note of, or mark the orientation of the globe that has been loosened and sitting in the capital before raising it out of the capital. This is for applications where photo controls are being used (See step #8 for more details).
6. Assemble the capital to the tenon on the pole top and secure by tightening the three set screws.
7. Connect supply conductors to the quick disconnect wiring harness, or terminal blocks if applicable, of the driver assembly.
8. For luminaires equipped with a twistlock photo-cell in the capital: Insert a photo-cell into the twistlock receptacle. Lower the connected fixture down towards the capital, making sure the globe is in the same orientation as it was taking off the capital (see step #5). This is so there is sufficient room for the photo-cell inside the capital. Align the globe into the specific orientation then tighten the button head set screws to lock luminaire into the capital. To orientate the photo-cell, loosen the three set screws in the capital and rotate the capital to the desired position, generally as close to NORTH as possible. Tighten back up the set screws when finished.
9. These luminaires are generally available with a type 3 or 5 distribution. If the luminaire is a type 5, it does not need to be orientated, however, if it a type 3, then it must be orientated. To orientate the luminaire, locate the notation “HOUSE SIDE” on the globe ring casting. This notation will be on the globe ring in the form of cast-in letters. Orientate the globe assembly so the “HOUSE SIDE” notation faces the house side of the street.
10. Reconnect the power supply and check for proper orientation.

Maintenance
Caution
Disconnect power supply before performing any maintenance on the luminaire!
Cleaning
Wipe off exterior dirt and grime to keep a professional look as well as keeping your luminaire at optimal performance.
Caution
Under no circumstance should the complete fixture, including refractor, be installed on the street light pole and arm on the ground prior to the pole being erected. By installing the complete and assembled luminaire to the pole/arm prior to pole erection ad then erecting the pole with the complete luminaire attached, will result in VOIDING of the King Luminaire warranty.

